
Forests are rich with storytelling potential, but they’re also one of the trickiest environments to photograph well. With so much going on visually, composition and light can easily get overwhelming.
Below are my top 17 woodland photography tips to help you master woodland photography and create images that do justice to these enchanted spaces.
Whether you’re working with misty pines or golden aspens, this guide will help you harness your camera settings, the quality of light, and your creative eye to elevate your work from snapshots to soulful storytelling.
Top 17 Tips for Woodland Photography Excellence
Why These Woodland Photography Tips Go Beyond the Basics
Most top-ranking guides give you 8–10 helpful tips but rarely connect vision, emotion, and craft. Where other posts stop at “use a tripod” or “chase soft light,” this guide ties those actions into your broader philosophy of reverence for nature and mindful creativity.
By combining practical tech guidance on white balance, exposure, lens choice (as discussed in our previous posts on ETTR, exposure triangle, long exposure, etc.), and composing with intentionality, you’re not just improving images, you’re deepening connectivity to place.
Woodland Photography Gear
- Sturdy Tripod from FLM
- Zoom (Canon 24-105mm)
- Long Range Zoom (100-500mm)
- Wide Angle (Rokinon 14mm)
- Remote Trigger (or use in Camera timer)
- Lens Cloths
- ND Filters
- Polarizer
Woodland Photography Tips at a Glance
Below is a quick reference chart of the tips which are expanded below.
| Tip # | Technique | What it Does |
|---|---|---|
| 1 | Embrace diffused light | Softer shadows and balanced tones |
| 2 | Chase atmospheric light | Adds mood and depth |
| 3 | Use leading lines | Guides viewer into the scene |
| 4 | Natural framing | Adds focus and structure |
| 5 | Avoid distractions | Simplifies composition |
| 6 | Use aperture creatively | Controls depth of field |
| 7 | Bring a tripod | Enables sharper images |
| 8 | Shoot in RAW | Post-processing flexibility |
| 9 | Use macro/zoom lenses | Highlight forest details |
| 10 | Mind your background | Keeps focus where you want it |
| 11 | Vary perspective | Uncovers new compositions |
| 12 | Try vertical framing | Works well with tall trees |
| 13 | Manual focus | Greater accuracy in busy scenes |
| 14 | Celebrate seasons | Tells a visual story |
| 15 | Use negative space | Adds calm and focus |
| 16 | Tell a story | Deepens emotional impact |
| 17 | Be patient | The best shots take time |
Embrace Diffused Light
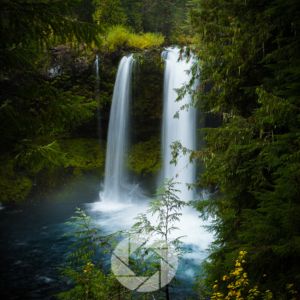
Under the forest canopy, light is a precious commodity. I cherish overcast days because the clouds act like a giant softbox, turning harsh shadows into gentle gradients.
This kind of soft, even light allows me to bring out subtle textures such as moss, bark, and water droplets, without the chaos of bright spots and deep shadows. When nature gifts you this gentle glow, lean into it and let it shape your tone.
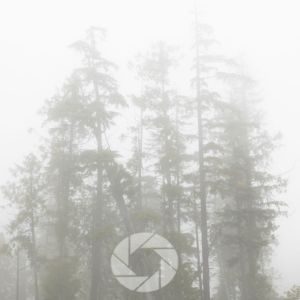
Chase Atmospheric Light

Follow the light. Golden hour and early mist can transform a scene into a living canvas. I chase the angled light that filters through branches and bathes trunks in warmth.
Dappled beams of sunlight illuminate dust motes and dancing leaves, creating ethereal glow.
That fleeting magic, whether in a thin veil of fog over a clearing or a soft twilight haze, is worth starting early or staying late for.
Use Leading Lines
Woodland trails carve visual pathways through your frame. Fallen logs, a braided creek, or aligned tree trunks can guide the viewer’s gaze naturally. I often position ferns or root systems in the foreground to pull the eye through the trail.
These natural lines invite exploration and echo the journey of walking through the woods.
Frame Your Subject Naturally

Arches of branches, trunks framing a clearing, or even a gap in dense foliage can serve as a natural frame.
I love positioning a central tree or a patch of golden leaves within this frame; it feels like opening a secret door.
These frames create context and direct focus while preserving the feeling of a sacred, hidden vista.
I love how the rocks in the Narrows Canyon at Zion National Park slightly frame this tiny tree.
Avoid Visual Distractions
A bright plastic wrapper, neon lichen, or a stray sap drip can draw attention away from your intended focus. I am always surveying the edges of my frame, mentally cleaning up the scene.
Sometimes that’s as simple as shifting three steps to one side or crouching lower to drop a branch out of view. It’s about simplifying the visual story so the forest can speak clearly.
Use Aperture Creatively
When I want to highlight a solitary mushroom or a twist of vine, I open up my aperture to f/2.8 or f/4. The soft bokeh behind the subject isolates its shape and texture.
But when capturing a grand scene with sunlit ferns and distant trees, I stop down to f/11 or more. That ensures the forest feels whole; from foreground detail to distant canopy.
Use a Tripod
Under dense canopy, light flickers and shadows deepen. I bring a tripod to anchor my frame and steady my vision. It’s not only practical: it also creates a slower pace, an invitation to lean into the scene.
Tripods enable longer exposures, focus stacking, or using smaller apertures without raising your ISO and adding noise.
Capture Detail with Macro and Zoom

Macro lenses or telephoto reach allow you to immortalize the small wonders of a woodland such as an intricate fungus pattern, a droplet perched on moss, or the veins of a golden leaf.
These close-up stories emphasize the interconnectedness of the forest, offering viewers a reminder of nature’s microcosmic beauty amid the larger landscape.
Shoot in RAW
Woodlands fluctuate between shadow and haze. Shooting in RAW preserves the full dynamic range. It gives latitude to recover shadow detail, fine-tune greens, and correct seasonal color shifts.
This flexibility ensures your images convey the fullness of the experience, in all its autumnal depth or muted winter calm.
Vary Your Perspective
Getting low to the forest floor or climbing a mossy log for a raised view, can unlock compositions that feel both intimate and expansive.
Low angles can frame emergent light in new ways; overhead perspectives can flatten detail into patterns of bark and leaf. Shifting perspective helps you see the forest differently each time.
Use Vertical and Horizontal Formats

Tall trees, shafts of light, or ascending ridgelines often lend themselves to vertical framing.
Meanwhile, sweeping views of fog through the forest or branching logs work beautifully in landscape orientation.
I switch between both based on what the scene feels like, rather than what seems technically “correct.”
Switch to Manual Focus When Needed
In heavy shade or dense foliage, autofocus systems can chase branches or blur in unpredictable ways. I frequently switch to manual focus to lock in on the subject I want especially when shooting through underbrush or highlighting a single leaf among the chaos.
Use Seasonal Color as a Palette
Spring’s fresh greens, summer’s deep shadows, autumn’s fiery tapestry, or winter’s mute silhouettes; each season offers a visual theme. I embrace seasonal color shifts as emotional markers: bright renewal in spring, quiet rusts in fall, monochrome stillness in winter.
Be Patient for Atmosphere
A clearing in the woods may hold no magic until the fog rolls in; or a ray of light reveals its hidden path. It often takes time. I slow my pace and listen: the woods speak softly in mist, in shifting light, in rising winds. Those moments of transformation often reward the waiting photographer.
Incorporate Negative Space

Sometimes the true subject is the emptiness between trunks; the framed void between branches.
Negative space can draw attention to the way light dances or the shape of a singular tree. I use emptier areas to let the eye rest and emphasize shape over detail.
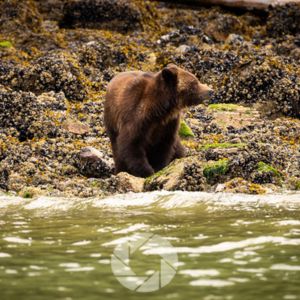
Tell a Visual Story
What is the woodland scene saying to you? Is it the cycle of life as observed in fallen logs and sprouting mushrooms? The interplay of light and shadow? The silence of untrodden ground? I choose focal elements such as color, contrast, subject, to echo that narrative, layering meaning into each frame.
Practice Patience and Reflection
Each outing into the forest becomes part of a larger creative practice. I reflect on what worked, what felt off, and what surprised me. Over time, this cyclical reflection sharpens not only my technical ability, but my sensitivity to the forest’s voice.
Conclusion: Woodland Photography Tips
Woodland photography is one of those genres that feels more like a meditation than a shoot. It demands patience, curiosity, and a willingness to adapt.
But it also offers a profound reward: a deeper connection to nature and the satisfaction of capturing scenes that feel like they belong to an old myth or dream.
📸Learn for free!
➡️ FREE Wallpapers and Guides
➡️ DISCOUNTS on future Tours & Tutorials
➡️ TIPS for improving Your photography

You can unsubscribe at anytime.
- Top 17 Tips for Woodland Photography Excellence
- Why These Woodland Photography Tips Go Beyond the Basics
- Woodland Photography Gear
- Woodland Photography Tips at a Glance
- Embrace Diffused Light
- Chase Atmospheric Light
- Use Leading Lines
- Frame Your Subject Naturally
- Avoid Visual Distractions
- Use Aperture Creatively
- Use a Tripod
- Capture Detail with Macro and Zoom
- Shoot in RAW
- Vary Your Perspective
- Use Vertical and Horizontal Formats
- Switch to Manual Focus When Needed
- Use Seasonal Color as a Palette
- Be Patient for Atmosphere
- Incorporate Negative Space
- Tell a Visual Story
- Practice Patience and Reflection
- Conclusion: Woodland Photography Tips
- 📸Learn for free!