Wide angle lenses are a landscape photographer’s best friend and sometimes our greatest challenge.
I remember the first time I used a wide lens in the Pacific Northwest.
I expected every scene to instantly become jaw-dropping… but instead, my photos felt oddly empty, stretched, or just off. Sound familiar?
In this post, I’m walking you through the 14 most common wide angle lens mistakes I’ve made (and see others make) and how to fix them.
Embrace Wide Angle Landscape Photography
Common Wide Angle Lens Mistakes in Landscape Photography and How to Fix Them
Wide angle lenses reveal so much of the scene that they also expose any compositional missteps. They’re powerful tools but they demand thoughtful handling.
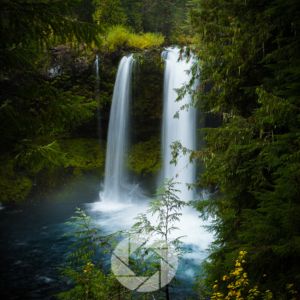
Whether you’re photographing vast desert scenes or mossy Oregon waterfalls, learning to master these wide angle lens mistakes can transform your images from chaotic to compelling.
If you’ve ever looked at a wide-angle photo and thought it looked better in person, chances are one of these subtle mistakes below was at play.
Luckily, once you know what to look for, they’re easy to avoid. The landscape will still offer its beauty, but now, you’ll know how to translate it into an image that truly tells a story.
Wide Angle Lens Mistakes Quick Table
| Mistake | Why It’s a Problem | How to Fix It |
|---|---|---|
| Placing the horizon dead-center | Can make the image feel static or split in half, lacking visual tension or direction. | Use the rule of thirds to place the horizon higher or lower based on whether sky or land dominates. |
| Ignoring foreground interest | Leads to empty, unengaging compositions that don’t invite the viewer in. | Include rocks, flowers, textures, or patterns close to the lens for depth and storytelling. |
| Empty or Unbalanced Foreground | Without a compelling subject there, your image might feel empty or bottom-heavy. | Add something meaningful to the foreground: flowers, textures in mud or sand, flowing water. |
| Objects too close to the edge of frame | Causes distortion; trees lean, people stretch, and shapes warp unnaturally. | Keep important elements away from the corners and edges; recompose slightly or zoom in a bit. |
| Over-relying on small apertures (f/16+) | Can introduce diffraction, reducing overall image sharpness. | Stick with the sweet spot of your lens (usually f/8 to f/11)for best sharpness and depth. |
| Distorted Horizon | Exaggerates perspective and can make the horizon curve or slope unnaturally. | Use a level and correct distortion in post using lens correction profiles. |
| Overexaggerated Perspective | Objects larger, taller, smaller than they actually are | Step back and tilt lens less to reduce distortion for more natural perspective. |
| Overcrowding the composition | Too many elements in one frame can feel chaotic or overwhelming. | Simplify! Focus on minimalism or strong leading lines to guide the viewer’s eye. |
| Sky Dominance with No Interest | Captures a Large area including the sky. | Find foreground interest or adjust the amount of sky in your image. |
| Forgetting to level the tripod or camera | Causes slanted horizons; especially noticeable in seascapes and lakes. | Use the electronic level in your camera or a hot shoe bubble level. |
| Subject Too Small | Viewer won’t know what the subject is and where to look in the image. | Move closer or use a longer focal length to make the subject more prominent in the frame. |
| Underestimating edge softness | Wide angles tend to lose sharpness in the corners, especially at wide apertures. | Shoot at mid-range apertures and avoid placing fine details at the extreme edges of the frame. |
| Shooting too high or from eye level | Misses opportunities to create immersive foreground and leading lines. | Get low to the ground to emphasize textures, lines, and spatial depth. |
| Vignetting | Dark edging around frame | Zoom out of take a step back, adjust via settings in camera, and/or stop down slightly |
📸Learn for free!
➡️ FREE Wallpapers and Guides
➡️ DISCOUNTS on future Tours & Tutorials
➡️ TIPS for improving Your photography

You can unsubscribe at anytime.
Wide Angle Lens Mistakes in Landscape Photography (and How to Solve Them)
Placing the Horizon Dead Centre
While centering the horizon can sometimes work (especially in symmetrical scenes like reflections) it often results in a static, less engaging photo.
Wide-angle lenses already expand the scene in dramatic ways, and placing the horizon dead center can divide that drama in half, making the photo feel more like a snapshot than an intentional composition.
How to Solve it: Instead, consider the rule of thirds. Ask yourself: What’s more interesting in this scene, the sky or the foreground?
If the sky is moody, colorful, or filled with compelling cloud structures, emphasize it by placing the horizon in the lower third. If the foreground has beautiful textures, leading lines, or vibrant seasonal color, raise the horizon and let the landscape dominate.
Where you place the horizon is more than a compositional choice; it’s a way of guiding your viewer’s attention to what matters most.

Discover Your Next Journey – These Tours are designed for people who connect with light and landscape.
Ignoring Your Foreground
Wide lenses exaggerate everything close to the lens including stray twigs, rocks, or overly busy elements. Instead of adding interest, they can create visual chaos.
How to Solve It: Get low, move around, and simplify. Choose one strong, intentional foreground element like a rock or log and compose carefully. Use your LCD screen to check for distractions before pressing the shutter.
Empty or Unbalanced Foreground
A wide-angle lens includes a lot of foreground, sometimes too much. Without a compelling subject there, your image might feel empty or bottom-heavy.
How to Solve It: Add something meaningful to the foreground: flowers, textures in mud or sand, flowing water. These details anchor the scene and guide the eye naturally into the image.
Objects too Close to the Edge of the Frame
With wide-angle distortion, objects near the edge can stretch unnaturally or even get partially cropped, making the composition feel off-balance. It can also cause important details to become unintended distractions.
How to Solve It: Compose with a bit of breathing room around important elements, especially near the frame’s borders.
Use the camera’s grid overlay to place key objects within safe zones.
Consider slightly reframing or stepping back to allow more room for cropping later if needed.
Over-relying on Small Apertures (f/16+)
It’s easy to assume that f/16 guarantees maximum depth of field, but going too small can actually introduce diffraction—a softening of image sharpness due to light bending around the edges of the aperture blades.
How to Solve It: Find your lens’s sweet spot, usually between f/8 and f/11, for the sharpest results.
If you need more depth of field, use focus stacking instead of pushing to f/22.
Reserve ultra-small apertures for when you absolutely need the depth and can afford the sharpness trade-off (e.g., shooting directly into a sunrise to create starbursts).
Distorted Horizons
Wide lenses can bow straight horizons, especially when the camera isn’t level. This distortion is particularly noticeable in seascapes or desert scenes.
How to Solve It: Use your camera’s built-in level, or a bubble level on your hot shoe. Keep the camera as level as possible, and correct minor distortion in post-processing or in camera using lens correction tools.

Overexaggerated Perspective
Wide lenses stretch the sense of space, sometimes so much that mountains or trees in the background look tiny and unimportant.
How to Solve It: Use this distortion creatively to emphasize leading lines or foreground drama, but balance it by carefully framing your background elements where they still carry visual weight.
Overcrowding Your Composition
Wide-angle lenses capture a lot of the scene, which can tempt you to include everything you see. The result? A cluttered image with no clear subject or visual flow. Instead of enhancing the viewer’s experience, it overwhelms them.
How to solve it: Be intentional: Ask yourself, what is the subject? Build your composition around that.
Use leading lines or natural framing to guide the viewer’s eye.
Apply the “less is more” principle; leave out anything that doesn’t strengthen the message or mood of the image.
Sky Dominance with No Interest
With a wide frame, you might unintentionally include a huge chunk of empty sky especially when shooting handheld or not paying attention to your composition.
How to Solve It: Ask yourself: is the sky adding anything? If not, tilt the camera down to fill more of the frame with land or use a graduated ND filter to bring out more detail in the sky. Shooting during golden hour or blue hour often solves this too, as the sky becomes a character in the shot.
Forgetting to Level Your Tripod
An unlevel tripod leads to tilted horizons, skewed perspectives, and extra time spent correcting in post. With wide-angle compositions, even a small tilt is exaggerated and can throw off an otherwise carefully planned frame.
How to solve it: Always use the built-in level feature on your tripod head or camera’s electronic level (virtual horizon).
Bring a small bubble level if your gear lacks built-in options.
Double-check alignment before every shot, especially if you’ve adjusted the legs on uneven terrain.

Subject Too Small
The vast field of view can make your main subject feel lost or insignificant, especially in minimalist or open landscapes.
How to Solve It: Use the wide angle to your advantage by exaggerating the subject’s closeness; get really close to your main element. This technique adds drama and anchors the viewer’s attention right away.
Additionally, tilting your lens downwards towards your subject can accentuate the size of a mountain or hill in the background
This image in Banff could have been improved if I was closer to the grasses in the foreground and then tilted my lens down.
Soft Edges and Corners
Wide lenses often show softness or even chromatic aberration near the edges of the frame, especially when shot wide open.
How to Solve It: Stop down your aperture to f/8 or f/11 for sharper results edge to edge. And always enable lens profile corrections in Lightroom or Photoshop to fix corner softness and vignetting.
Shooting Too High or From Eye Level
One of the most common mistakes with wide-angle lenses is shooting from a standing, eye-level position. It’s intuitive; we naturally raise the camera to our eye and shoot from where we stand.
But with wide-angle lenses, this often flattens the scene and wastes the dramatic potential that these lenses offer. You lose the sense of depth and scale that makes a wide-angle image so immersive.
How to Solve It: When you lower your vantage point, sometimes even placing the camera just inches off the ground, you exaggerate the foreground, draw the viewer into the scene, and create strong visual pathways through your composition.
Think about rocks, flowers, leaves, or textures that can fill the lower frame and lead the eye toward your main subject. Changing your physical position, even slightly, can turn a flat image into one with real depth and impact.
Don’t be afraid to get low, kneel, or lie down to unlock more dynamic perspectives.
Vignetting
Vignetting is the darkening of the corners of an image, which can be especially noticeable when using wide-angle lenses at their widest aperture or when stacking filters. In landscape photography, where even exposure across the frame is often ideal, this can create an uneven or distracting look that pulls attention away from the scene’s natural balance.
How to Solve It: Stop down your aperture slightly (e.g., from f/2.8 to f/5.6 or f/8), as vignetting is usually worse at wide-open settings. Use slim or low-profile filters to reduce stacking issues.
Correct it in post-processing using the Lens Corrections panel in Lightroom or similar software.
Check your lens hood; an improperly mounted or incompatible hood can also cause vignetting.
Conclusion
Mastering wide angle photography isn’t about rules; it’s about awareness. Once you start noticing how a low perspective deepens your foreground or how shifting the horizon line changes the emotional pull of an image, you’ll begin composing with more confidence and clarity.
These aren’t just technical adjustments; they’re creative choices that give your images purpose and voice.
📸Learn for free!
➡️ FREE Wallpapers and Guides
➡️ DISCOUNTS on future Tours & Tutorials
➡️ TIPS for improving Your photography
You can unsubscribe at anytime.