There’s something undeniably magical about fog photography. A familiar landscape can be transformed into something mysterious, mystical, even otherworldly, simply because a veil of mist drifts across the scene.
For photographers, fog is both a challenge and a gift. It strips away clutter, softens harsh light, and forces you to see in new ways.
At the same time, it tests your technical skills, demanding patience, awareness, and a willingness to embrace unpredictability.
In this guide, I’ll share everything you need to know about photographing fog, mist, and haze; from camera settings and creative ideas to editing tips in Photoshop.
I receive a small commission from links in this post, thank you for your support
Your Fog Photography Guide
What Is Fog?
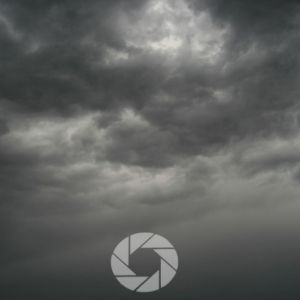
Before diving into technique, let’s talk briefly about what is fog. Fog is essentially a low-lying cloud that forms near the ground when warm, moist air meets cooler air and condenses into tiny water droplets.
It often appears in valleys at dawn, along coastlines, or after rainfall when the temperature drops overnight.
For photographers, fog acts like a giant diffuser. It softens light, reduces contrast, and creates atmospheric depth. The world feels quieter, more intimate, more still; a gift to those of us who want to photograph not just the land, but its mood.
Pictures of Fog
If you’ve ever searched for pictures of fog, you’ll know how varied they can be. Some are haunting black and whites of lone trees in mist.
Others are pastel sunrise landscapes where fog lifts slowly to reveal hidden peaks. Still others are urban scenes; bridges disappearing into haze or city streets wrapped in mystery.
This is why fog appeals so widely: it gives everyday places a new identity. For my own work, fog allows me to tell stories of the Earth’s hidden face; the way she covers herself in a soft cloak, revealing only what she chooses in that moment.
Fog Photography Gear
- Sturdy Tripod from FLM
- Zoom (Canon 24-105mm)
- Long Range Zoom (100-500mm)
- Wide Angle (Rokinon 14mm)
- Remote Trigger (or use in Camera timer)
- Lens Cloths
- ND Filters
- Polarizer
Top 10 Fog Photography Tips Quick List
- Scout your locations ahead of time because fog is fleeting.
- Arrive early, as fog often burns off quickly after sunrise.
- Embrace silhouettes to add drama and mood.
- Don’t fear flat light, instead use it to create soft, intimate images.
- Be patient; fog shifts minute by minute, revealing new scenes.
- Look for layers in valleys, forests, and ridgelines to add depth.
- Watch your exposure to keep fog luminous.
- Protect your gear from moisture and condensation.
- Experiment with long exposures (10–30 seconds) to capture drifting fog.
- Focus on mood, not just place and tell the emotional story of the scene.

Discover Your Next Journey – These Tours are designed for people who connect with light and landscape.
Top 10 Fog Photography Tips Quick List
Scout your locations ahead of time
Fog is fleeting, and if you’re still looking for a composition while it drifts away, you’ll miss the shot. Visit your locations in clear weather first to understand the lay of the land, where the sun rises, and how foreground elements line up with your subject. Preparation lets you react quickly when fog appears.
Arrive early as fog burns off quickly
Some of the best fog photography happens in the quiet minutes before and just after sunrise. As the sun warms the air, fog starts to thin and rise, often disappearing within an hour. Be on location well before dawn so you can set up and capture the atmosphere at its peak.
Embrace silhouettes for drama
Fog reduces detail and flattens contrast, making strong shapes stand out beautifully. A lone tree, a church steeple, or a person walking through the mist becomes instantly dramatic when rendered as a silhouette. This is one of the simplest ways to turn ordinary scenes into striking images.
Don’t fear flat light
Fog diffuses sunlight, eliminating harsh shadows and highlights. Instead of fighting the “flatness,” lean into it. Soft light creates a quiet, intimate atmosphere that feels painterly. Look for subtle tones, pastel skies, and minimal compositions.
Be patient because fog is always moving
Fog shifts minute by minute. A subject that’s hidden one moment may appear in a perfect pocket of mist the next. Stay with your scene and allow it to change.
Some of the most magical shots happen just as the fog begins to lift or thin, revealing layers of depth you couldn’t see before. If you’re bored, bring a book, some playing cards, talk with your colleagues.
Watch for layers and depth
Fog often settles in bands across valleys or forests. Position yourself to capture those layers, using trees, hills, or ridgelines to show depth. These compositions feel almost three-dimensional and convey the sense of atmosphere more powerfully.
Mind your exposure
Fog can trick your camera’s meter into underexposing the scene, leaving images too dark. Use exposure compensation (+1 stop is often a good starting point) to keep fog looking luminous and bright rather than dull and gray. Always check your histogram and adjust as needed.
Protect your gear
Fog is moisture. Over time, that dampness can settle on your lens or even seep into your camera. Bring a lens cloth to wipe condensation, keep a rain cover handy, and store your gear in a sealed bag as you move between humid and dry environments to avoid fogging inside your lens.
Use longer exposures creatively
If the fog is drifting through a valley or across water, try a long exposure (10–30 seconds) to show its movement. This turns fog into a silky veil that flows across your frame, adding a dreamlike quality to your landscape images.
Tell the story of mood, not just place
Fog photography isn’t only about documenting what you see; it’s about capturing how the scene feels. Think about what the fog is saying: mystery, solitude, peace, transition. Allow your photos to carry that emotion, and they’ll resonate more deeply with your audience.
Fog Photography Quick-Reference Chart
| Category | Recommendations |
|---|---|
| Best Time | Early morning (before/just after sunrise); after rainfall; autumn & spring are prime |
| Key Lenses | Wide-angle (16–35mm) for atmosphere; telephoto (70–200mm) for isolating subjects |
| ISO | 100–400 (raise only if very dim) |
| Aperture | f/8–f/11 for landscapes; f/2.8–f/4 for subject isolation |
| Shutter Speed | Standard: 1/60–1/250 sec; Long exposures: 10–30 sec for moving fog |
| Exposure Compensation | +0.3 to +1 stop to avoid underexposed, dull fog |
| Focus | Manual focus or focus peaking (AF often struggles in fog) |
| Composition Tips | Simplify frames; use silhouettes; look for layers and leading lines |
| Creative Ideas | Black & white conversions, reflections in water, long exposures for drifting fog |
| Gear Protection | Lens cloths for condensation; rain cover; sealed bag when moving indoors/outdoors |
Foggy Photo: The Power of One Image
Sometimes a single foggy photo says more than a dozen sunny landscapes. Fog reduces distractions, isolating a subject such as a tree, a ridge, a figure walking in the distance.
If you’re struggling with composition, fog can be a great teacher. Because visibility is reduced, you’re forced to simplify your frame. Look for bold shapes, leading lines, or silhouettes. Try stepping back and asking yourself: “If all I had was this one shape in the fog, would the image still work?”
Fog Photos: Building a Collection
While one shot can be powerful, a series of fog photos tells a deeper story. Photographing fog across different locations, times of day, or seasons creates variety in your portfolio.
- Dawn fog over a lake feels serene and reflective.
- Mid-morning valley fog can create a dramatic “sea of clouds.”
- Fog in forests feels enclosed and mystical, like walking into another world.
Together, these images form not just pictures, but a visual meditation on atmosphere.
Foggy Landscape Photography
When it comes to foggy landscape photography, the key is to embrace minimalism. Fog reduces detail, so instead of chasing complexity, focus on mood.
- Forests: Fog weaves light shafts between trees, creating natural spotlights.
- Mountains: Peaks rising above a fog layer appear mythic, like floating islands.
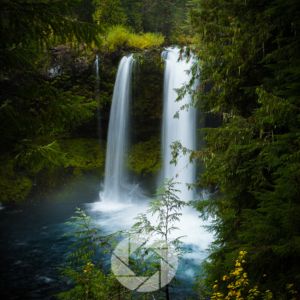
- Water scenes: Fog over lakes or rivers doubles the sense of mystery, especially with reflections.
For me, this is where eco-spiritual connection comes alive. Fog feels like the Air element made visible, moving through Earth and Water, softening Fire’s light. Photographing in fog is photographing breath itself.
How to Enhance Fog in Photoshop
If you already have fog in your image but want to bring it out, here’s a quick workflow:
- Duplicate your base layer.
- Use a curves adjustment to brighten highlights and gently lift shadows.
- Apply a gradient mask from the ground upward to create a natural fog rise.
- Lower contrast selectively with the brush tool to “push” fog into the background.
Remember, subtlety is key. You’re not creating fog; you’re enhancing the atmosphere that was already there.
Creating Fog in Photoshop
Not every day delivers perfect fog, and sometimes you want to enhance what’s already there. This is where fog Photoshop techniques come in handy.
- Use the Dehaze slider in Lightroom/Camera Raw (negative values add softness).
- Apply graduated filters with lowered clarity to mimic fog layers.
- In Photoshop, use the “Render > Clouds” filter with layer masks to add subtle haze.
Fog Photography Ideas
If you’re feeling stuck, here are some fog photography ideas to inspire you:
- Photograph a lone tree or subject emerging from fog.
- Capture reflections of fog in lakes or puddles.
- Use long exposures to blur moving fog across valleys.
- Find high ground and shoot “above the fog” for a sea of clouds.
- Experiment with black and white to emphasize shape and texture.
Fog invites experimentation. It rewards those who wander slowly, watching how light and mist dance together.
Fog Photography Settings
Getting your settings right is crucial. Fog confuses cameras, often leading to underexposed or flat images.
- ISO: Keep it low (100–400) for clean files unless you’re in very dim conditions.
- Aperture: f/8–f/11 for landscapes; open up to f/2.8–f/4 for subject isolation.
- Shutter Speed: Adjust based on light. For moving fog, try long exposures (10–30 seconds).
- Focus: Use manual focus or focus peaking if possible; autofocus often struggles in fog.
- White Balance: Cloudy or shade adds warmth; auto can work but sometimes skews cool.
Creative and Mystical Angles for Fog Photography
Beyond settings and gear, fog is about atmosphere. This is where related searches like “mystical photography tips” and “photographing misty forests” come alive.
Fog photography is about more than capturing scenery; it’s about capturing feeling. Ask yourself: What does this fog feel like? What story does it tell? Sometimes it feels heavy, like Earth exhaling. Sometimes it feels light, like Air dancing across the land.
In pagan tradition, fog is liminal; a space between worlds. Photographing in fog reminds us of interconnectedness, of the thin veil between seen and unseen.
Conclusion
Fog photography challenges you to slow down, simplify, and see the world differently. It teaches you that landscapes aren’t just about what’s visible, but about what’s hidden, softened, or revealed for a moment in time.
From understanding what fog is, to photographing forests and lakes, to enhancing atmosphere in Photoshop, the possibilities are endless. Whether you’re capturing a single foggy photo of a lone tree or building a gallery of mist-filled landscapes, fog invites you into a conversation with nature.
📸Learn for free!
➡️ FREE Wallpapers and Guides
➡️ DISCOUNTS on future Tours & Tutorials
➡️ TIPS for improving Your photography

You can unsubscribe at anytime.
- Your Fog Photography Guide
- What Is Fog?
- Pictures of Fog
- Fog Photography Gear
- Top 10 Fog Photography Tips Quick List
- Top 10 Fog Photography Tips Quick List
- Fog Photography Quick-Reference Chart
- Foggy Photo: The Power of One Image
- Fog Photos: Building a Collection
- Foggy Landscape Photography
- How to Enhance Fog in Photoshop
- Creating Fog in Photoshop
- Fog Photography Ideas
- Fog Photography Settings
- Creative and Mystical Angles for Fog Photography
- Conclusion
- 📸Learn for free!